
Patterns
4 Directional Punch
Parallel Ready Stance
- Move Right Foot Forward into Walking Stance – Middle Obverse Punch
- Move Right Foot Back into Walking Stance – Low Outer Forearm Block
- Move Right Foot Forward into Walking Stance – Middle Obverse Punch
- Move Right Foot Back into Walking Stance – Low Outer Forearm Block
- Move Right Foot Forward into Walking Stance – Middle Obverse Punch
- Move Right Foot Back into Walking Stance – Low Outer Forearm Block
- Move Right Foot Forward into Walking Stance – Middle Obverse Punch
4 Directional Block
Parallel Ready Stance
- Move Right Foot Back into Walking Stance – Low Knifehand Block
- Move Right Foot Forward into Walking Stance – Middle Inner Forearm Block
- Move Right Foot Back into Walking Stance – Low Knifehand Block
- Move Right Foot Forward into Walking Stance – Middle Inner Forearm Block
- Move Right Foot Back into Walking Stance – Low Knifehand Block
- Move Right Foot Forward into Walking Stance – Middle Inner Forearm Block
- Move Right Foot Back into Walking Stance – Low Knifehand Block
- Move Right Foot Forward into Walking Stance – Middle Inner Forearm Block
Chon-Ji Tul (19 Moves)
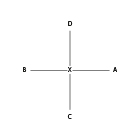
Pattern notes
Parallel Ready Stance
- Left Walking Stance – Low Outer Forearm Block
- Right Walking Stance – Middle Obverse Punch
- Right Walking Stance – Low Outer Forearm Block
- Left Walking Stance – Middle Obverse Punch
- Left Walking Stance – Low Outer Forearm Block
- Right Walking Stance – Middle Obverse Punch
- Right Walking Stance – Low Outer Forearm Block
- Left Walking Stance – Middle Obverse Punch
- Right L Stance – Middle Inner Forearm Block
- Right Walking Stance – Middle Obverse Punch
- Left L Stance – Middle Inner Forearm Block
- Left Walking Stance – Middle Obverse Punch
- Right L Stance – Middle Inner Forearm Block
- Right Walking Stance – Middle Obverse Punch
- Left L Stance – Middle Inner Forearm Block
- Left Walking Stance – Middle Obverse Punch
- Right Walking Stance – Middle Obverse Punch
- Left Walking Stance – Middle Obverse Punch
- Right Walking Stance – Middle Obverse Punch
Left foot back to Ready Stance
Dan Gun Tul (21 Moves)
Pattern notes
Parallel Ready Stance
- Right – L Stance – Middle Knife Hand Guarding Block
- Right – Walking Stance – High Obverse Punch
- Left – L Stance – Middle Knife Hand Guarding Block
- Left – Walking Stance – High Obverse Punch
- Left – Walking Stance – Low Outer Forearm Block
- Right – Walking Stance – High Obverse Punch
- Left – Walking Stance – High Obverse Punch
- Right – Walking Stance – High Obverse Punch
- Right – L Stance – Twin Forearm Block
- Right – Walking Stance – High Obverse Punch
- Left – L Stance – Twin Forearm Block
- Left – Walking Stance – High Obverse Punch
- Left – Walking Stance – Low Outer Forearm Block
- Left – Walking Stance – Rising Block
- Right – Walking Stance – Rising Block
- Left – Walking Stance – Rising Block
- Right – Walking Stance – Rising Block
- Right – L Stance – Middle – Knife Hand Strike
- Right – Walking Stance – High Obverse Punch
- Left – L Stance – Middle Knife Hand Strike
- Left – Walking Stance – High Obverse Punch
Left foot back to Ready Stance
Whon-Yo Tul (28 Moves)

Pattern notes
Close Ready Stance ‘A’
- Right – L Stance Twin Forearm Block
- Right – L Stance High Inward Knife Hand Strike (Right)
- Left – Fixed Stance – Middle Side Punch
- Left – L Stance -Twin Forearm Block
- Left – L Stance – High Inward Knife Hand Strike (Left)
- Right – Fixed Stance – Middle Side Punch
- Bending Ready ‘A’ – Forearm Guarding Block
- Middle Side Piercing Kick
- Right – L Stance – Middle Knife Hand Guarding Block
- Left – L Stance – Middle Knife Hand Guarding Block
- Right – L Stance – Middle Knife Hand Guarding Block
- Right – Walking Stance – Middle Straight Finger Tip Thrust
- Right – L Stance – Twin Forearm Block
- Right – L Stance – High Inward Knife Hand Strike (Right)
- Left – Fixed Stance – Middle Side Punch
- Left – L Stance – Twin Forearm Block
- Left – L Stance – High Inward Knife Hand Strike (Right)
- Right – Fixed Stance – Middle Side Punch
- Left – Walking Stance – Circular Block (Right)
- Low – Front Snap Kick
- Right – Walking Stance – Middle Reverse Punch
- Right – Walking Stance – Circular Block (Left)
- Low – Front Snap Kick
- Left – Walking Stance – Middle Reverse Punch
- Bending Ready ‘A’ – Forearm Guarding Block
- Middle Side Piercing Kick
- Right – L Stance – Forearm Guarding Block
- Left – L Stance – Forearm Guarding Block
Right foot back to Ready Stance
Yul-Gok Tul (38 Moves)

Pattern notes
Parallel Ready Stance
- Sitting Stance – Middle Left Focus Punch
- Sitting Stance – Middle Right Front Punch (Fast)
- Sitting Stance – Middle Left Front Punch (Fast)
- Sitting Stance – Middle Right Focus Punch
- Sitting Stance – Middle Left Front Punch (Fast)
- Sitting Stance – Middle Right Front Punch (Fast)
- Right – Walking Stance – High Inner Forearm Block
- Low Front Snap Kick
- Left – Walking Stance – Middle Obverse Punch (Fast)
- Left – Walking Stance – Middle Reverse Punch (Fast)
- Left – Walking Stance – High Inner Forearm Block
- Low Front Snap Kick
- Right – Walking Stance – Middle Obverse Punch (Fast)
- Right – Walking Stance – Middle Reverse Punch (Fast)
- Right – Walking Stance – High Hooking Block
- Right – Walking Stance – High Reverse Hooking Block
- Right – Walking Stance – Middle Obverse Punch (Connecting)
- Left – Walking Stance – High Hooking Block
- Left – Walking Stance – High Reverse Hooking Block
- Left – Walking Stance – Middle Obverse Punch (Connecting)
- Right – Walking Stance – Middle Obverse Punch
- Bending Ready Stance ‘A’
- Middle Side Piercing Kick
- Left – Walking Stance – Middle Front Elbow (Right)
- Bending Ready Stance ‘A’
- Middle Side Piercing Kick
- Right – Walking Stance – Middle Front Elbow (Left)
- Right – L Stance – Twin Knife Hand Block
- Right – Walking Stance – Middle Straight Finger Tip Thrust
- Left – L Stance – Twin Knife Hand Block
- Left – Walking Stance – Middle Straight Finger Tip Thrust
- Left – Walking Stance – High Outer Forearm Block
- Left – Walking Stance – Middle Reverse Punch
- Right – Walking Stance – High Outer Forearm Block
- Right – Walking Stance – Middle Reverse Punch
- Left – X Stance – High Left Backfist Strike (Jumping)
- Right – Walking Stance – High Double Forearm Block
- Left – Walking Stance – High Double Forearm Block
Right foot back to Ready Stance
Joon-Gun Tul (32 Moves)
Pattern notes
Close Ready Stance ‘B’
- Right – L Stance – Middle Reverse Knife Hand Block
- Low Front Snap Kick (Left)
- Left – Rear Foot Stance – Middle Palm Upper Block
- Left – L Stance – Middle Reverse Knife Hand Block
- Low Front Snap Kick (Right)
- Left – Rear Foot Stance – Middle Palm Upper Block
- Right – L Stance – Middle Knife Hand Guarding Block
- Left – Walking Stance – High Upper Elbow Strike
- Left – L Stance – Middle Knife Hand Guarding Block
- Right – Walking Stance – High Upper Elbow Strike
- Left – Walking Stance – High Twin Vertical Punch
- Right – Walking Stance – Middle Twin Upset Punch
- Left – Walking Stance – ‘X’ Fist Rising Block
- Right – L Stance – High Backfist Strike
- Left – Walking Stance – Release (slipping front leg forward)
- High Reverse Punch
- Right – L Stance – High Backfist Strike
- Left – Walking Stance – Release (slipping front leg forward)
- High Reverse Punch
- Left – Walking Stance – High Double Forearm Block
- Right – L Stance – Middle Side Punch (pull front leg)
- Middle Side Piercing Kick
- Left – Walking Stance – High Double Forearm Block
- Right – L Stance – Middle Side Punch (pull front leg)
- Middle Side Piercing Kick
- Right – L Stance – Middle Forearm Guarding Block
- Left – Low Stance – Pressing Block
- Left – L Stance – Middle Forearm Guarding Block
- Right – Low Stance – Pressing Block
- Close – Middle Control Technique (slow)
- Right – Fixed Stance – ‘U’ Shape Block
- Left – Fixed Stance – ‘U’ Shape Block
Right foot back to Ready Stance
Toi-Gye Tul (37 Moves)
Pattern notes
Close Ready Stance ‘B’
- Right – L Stance – Middle Inner Forearm Block
- Left – Walking Stance – Low Upper Finger Tip Thrust
- Close – Low Left Outer Forearm Block, High Right Backfist Strike
- Right – L Stance – Middle Inner Forearm Block
- Left – Walking Stance – Low Upper Finger Tip Thrust
- Close – Low Left Outer Forearm Block, High Right Backfist Strike
- Left – Walking Stance – Low ‘X’ Fist Pressing Block (Continuous Motion)
- Left – Walking Stance – High Twin Vertical Punch
- Middle Front Snap Kick (Right)
- Right – Walking Stance – Middle Obverse Punch
- Right – Walking Stance – Middle Reverse Punch
- Close – Posture Mode (both Fists to Hips)
- Sitting Stance – ‘W Shaped Block (Right)
- Sitting Stance – ‘W Shaped Block (Right)
- Sitting Stance – ‘W Shaped Block (Left)
- Sitting Stance – ‘W Shaped Block (Right)
- Sitting Stance – ‘W Shaped Block (Right)
- Sitting Stance – ‘W Shaped Block (Left)
- Right – L Stance – Low Double Forearm Pushing Block
- Left – Walking Stance – Double Hand Grasp
- Knee Kick (Pull Hands)
- Right – L Stance – Middle Knife Hand Guarding Block
- Low Front Snap Kick (Left)
- Left – Walking Stance – High Finger Tip Thrust
- Right – L Stance – Middle Knife Hand Guarding Block
- Low Front Snap Kick (Right)
- Left – Walking Stance – High Finger Tip Thrust
- Right – L Stance – High Right Backfist Strike, Low Left Outer Forearm Block
- Right – X Stance – Low ‘X’ Fist Pressing Block (Jumping)
- Right – Walking Stance – High Double Forearm Block
- Right – L Stance – Low Knife Hand Guarding Block
- Left – Walking Stance – Right Circular Block
- Right – L Stance – Low Knife Hand Guarding Block
- Left – Walking Stance – Left Circular Block
- Right – Walking Stance – Right Circular Block
- Left – Walking Stance – Left Circular Block
- Sitting Stance – Middle Right Front Punch
Right foot back to Ready Stance
Hwa-Rang Tul (29 Moves)
Pattern notes
Close Ready Stance ‘C’
- Sitting Stance – Middle Palm Pushing Block
- Maintain Stance – Middle Right Punch
- Maintain Stance – Middle Left Punch
- Left – L Stance – Twin Forearm Block
- Maintain Stance – Upward Punch (Left)
- Fixed Stance – Middle Side Punch (Right)
- Vertical Stance – Downward Knife Hand Strike (Right)
- Left – Walking Stance – Middle Front Punch
- Left – Walking Stance – Low Outer Forearm Block
- Right – Walking Stance – Middle Front Punch
- Slip – Left Leg – Grasp Right Fist with Left Hand
- Middle – Side Piercing Kick (pull both hands opposite)
- Left – Walking Stance – Middle Front Punch
- Right – Walking Stance – Middle Front Punch
- Right – L Stance – Middle Knife Hand Guarding Block
- Right – Walking Stance – Middle Straight Finger Tip Thrust
- Right – L Stance – Middle Knife Hand Guarding Block
- High Turning Kick (Right)
- High Turning Kick (Left)
Right – L Stance – Middle Knife Hand Guarding Block - Left – Walking Stance – Low Outer Forearm Block
- Right – L Stance – Middle Obverse Punch (Right)
- Left – L Stance – Middle Obverse Punch (Left)
- Right – L Stance – Middle – Obverse Punch (Right)
- Left – Walking Stance – Low ‘X’ Fist Pressing Block
- Right – L Stance – Low Side Elbow
- Close – Middle Inner Forearm Block (Right), Low Outer Forearm Block
- Close – (Change Position of Hands)
- Right – L Stance – Middle Knife Hand Guarding Block
- Left – L Stance – Middle Knife Hand Guarding Block
Right foot back to Ready Stance
Do-San Tul (24 Moves)
Pattern notes
Parallel Ready Stance
- Left – Walking Stance – High Outer Forearm Block
- Left – Walking Stance – Middle Reverse Punch
- Right – Walking Stance – High Outer Forearm Block
- Right – Walking Stance – Middle Reverse Punch
- Right – L Stance – Middle Knife Hand Guarding Block
- Right – Walking Stance – Middle Straight Fingertip Thrust
- Left – Walking Stance – Release, High Backfist
- Right – Walking Stance – High Backfist
- Left – Walking Stance – High Outer Forearm Block
- Left – Walking Stance – Middle Reverse Punch
- Right – Walking Stance – High Outer Forearm Block
- Right – Walking Stance – Middle Reverse Punch
- Left – Walking Stance – High Wedging Block
- Middle Front Snap Kick
- Right – Walking Stance – Middle Obverse Punch (Fast)
- Right – Walking Stance – Middle Reverse Punch (Fast)
- Right – Walking Stance – High Wedging Block
- Middle Front Snap Kick
- Left – Walking Stance – Middle Obverse Punch (Fast)
- Left – Walking Stance – Middle Reverse Punch (Fast)
- Left – Walking Stance – Rising Block
- Right – Walking Stance – Rising Block
- Sitting Stance – Middle Knife Hand Strike (Left)
- Sitting Stance – Middle Knife Hand Strike (Right)
Right foot back to Ready Stance
Choong-Moo Tul (30 Moves)
Pattern notes
Parallel Ready Stance
- Right – L Stance – Twin Knife Hand Block
- Right – Walking Stance – High Inward Knife Hand Strike (Right Hand), High – Knife Hand Guarding Block (Left)
- Left – L Stance – Middle Knife Hand Guarding Block
- Left – Walking Stance – High Finger Tip Thrust (Obverse)
- Right – L Stance – Middle Knife Hand Guarding Block
- Left – Bending ‘A’ – Middle Forearm Guarding Block
- Middle Side Piercing Kick
- Right – L Stance – Middle Knife Hand Guarding Block
- Flying Side Piercing Kick (Right), Left – L Stance – Middle Knife Hand Guarding Block
- Right – L Stance – Low Outer Forearm Block
- Left – Walking Stance – Grab Opponents Head with Hands
- Upward Knee Kick (Right – pull hands)
- Left – Walking Stance – High Front Reverse Knife Hand Strike (Right)
- High Turning Kick (Right)
- Middle Back Piercing Kick (Left)
- Left – L Stance – Middle Forearm Guarding Block
- Middle – Turning Kick (Left)
- Fixed Stance – ‘U’ Shaped Block
- Left – L Stance – Middle(Jump 360 s) Knife Hand Guarding Block
- Left – L Stance – Low Upset Finger Tip Thrust
- Right – L Stance – High Backfist Strike, Low Outer Forearm Block
- Right – Walking Stance – Middle Straight Finger Tip Thrust
- Left – Walking Stance – High Double Forearm Block
- Sitting Stance – Middle Front Inward Block (Right), High Side Backfist Strike (Right)
- Middle Side Piercing Kick (Right)
- Middle Side Piercing Kick (Left)
- Left – L Stance – Middle ‘X’ Knife Hand Checking Block
- Left – Walking Stance – Middle Upward Twin Palm Block
- Right – Walking Stance – Forearm Rising Block
- Right – Walking Stance – Middle Reverse Punch
Left foot back to Ready Stance